How to Export Stems for Mixing: Studio One, Logic Pro, Pro Tools, FL Studio, Ableton Live, BandLab, and More
Sending your song to a mixing engineer should not feel complicated. Whether you recorded vocals in BandLab, produced the beat in FL Studio, built the session in Logic Pro, or finished the full record in Studio One, the goal is the same: export clean, organized audio files that open correctly in any professional recording studio.
To export stems for mixing, send WAV files at your original session sample rate, use 24-bit audio or your native session bit depth, make every file begin at the same starting point, turn normalization off, remove master bus limiting, label the tracks clearly, and include a rough mix so the engineer understands your direction.
At Blak Marigold Studio, we work with artists who record in all types of environments, from home setups and mobile apps to full professional sessions. Correctly prepared files give your mixing and mastering engineer more time to focus on what matters: vocal clarity, low-end control, emotion, movement, width, punch, and a final record that translates outside of the room where it was created.
Ready to send your song to a professional mixing engineer?
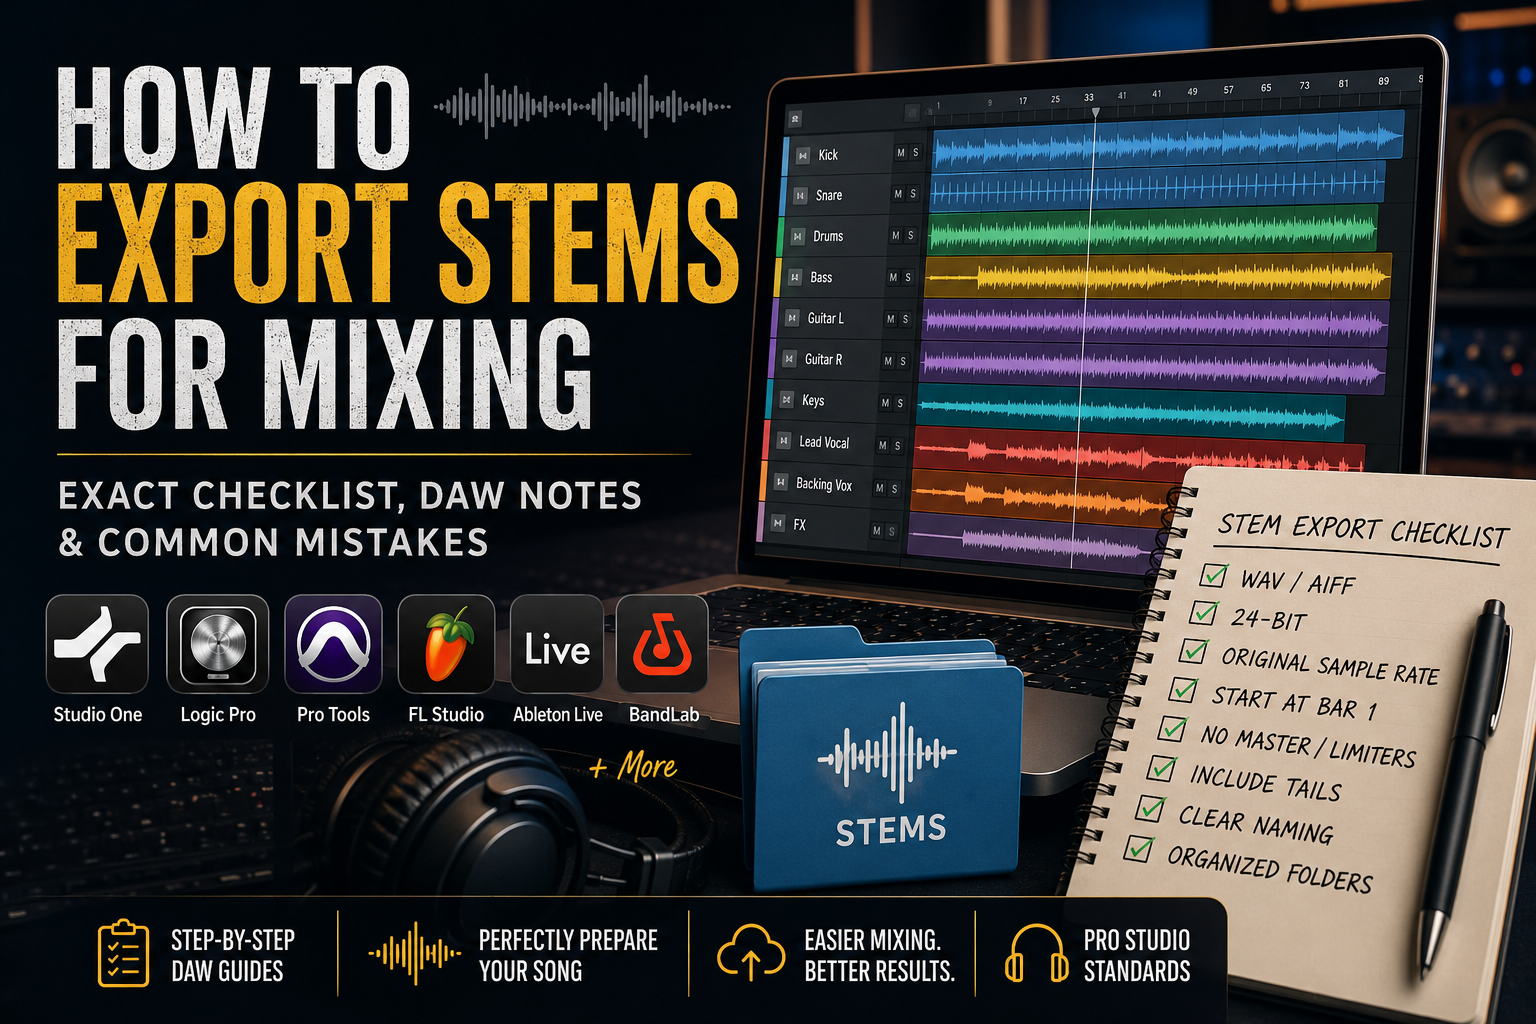
Table of Contents
What Are Stems and Multitracks?
Quick Stem Export Checklist Before You Send Your Song
The Best Export Settings for Professional Mixing and Mastering
Should You Export Stems Dry or With Effects?
How to Organize Your Stem Folder Before Uploading
How to Export Stems in Studio One
How to Export Stems in Logic Pro
How to Export Stems in Pro Tools
How to Export Stems in FL Studio
How to Export Stems in Ableton Live
How to Export Stems in BandLab
Notes for GarageBand, Cubase, and Reaper Users
Common Stem Export Mistakes That Delay Your Mix
What Happens After You Upload Your Stems?
Frequently Asked Questions About Exporting Stems for Mixing
What Are Stems and Multitracks?
Artists often use the word “stems” to describe every audio file being sent to a mixing engineer. That is common, and it is why most people search for how to export stems for mixing. Technically, there is a difference between stems and multitracks.
Multitracks are individual tracks from your session. Examples include:
Kick
Snare
Hi hat
808
Piano
Lead synth
Lead vocal
Ad lib vocal
Background vocal left
Background vocal right
Vocal delay throw
Stems are grouped into audio files. Examples include:
All drums together
All music together
All lead vocals together
All background vocals together
All effects together
For a professional mix, individual multitracks usually give the engineer the most flexibility. An engineer can shape the snare without changing the kick, repair a harsh background vocal without affecting the lead, or make the 808 work with the kick rather than fight it.
Grouped stems can still be useful. They are common for live shows, remixes, alternate versions, and quick delivery. However, when you are paying for detailed mixing and mastering, send the most separated files you have available unless your engineer tells you otherwise.
For the rest of this guide, we will use the word “stems” because that is the term most artists recognize when preparing their song for a mixing engineer.
Quick Stem Export Checklist Before You Send Your Song
Before you upload audio files to a mixing and mastering studio, run through this checklist. It prevents missing tracks, timing problems, and avoidable back-and-forth before the mix begins.
Export WAV files rather than MP3 files.
Use the same sample rate as your original recording session.
Use 24-bit audio unless your session or engineer requires another native format.
Make every audio file begin from the same starting point, even when a part does not play until later in the song.
Turn normalization off during export.
Remove limiting, clipping, and final loudness processing from the master output before exporting files for mixing.
Keep effects that create the actual sound, or send both a dry and an effected version when you are unsure.
Include separate reverb, delay, or special effect files when those effects are essential to the record.
Label files clearly, such as Lead Vocal, Hook Background Left, Kick, 808, or Piano.
Include your rough mix so the engineer hears the energy, effects, and balance you were aiming for.
Include your BPM, song key when known, reference songs, and any creative notes.
Listen to your exported files in a new blank session before sending them.
This is the fastest way to avoid the classic situation where an artist sends a folder called “final stems final version new,” and the lead vocal is somehow missing. Your engineer can fix a lot of things, but they cannot mix a vocal that never arrived.
The Best Export Settings for Professional Mixing and Mastering
Your DAW may look different from another artist’s setup, but the professional file-preparation rules remain consistent. These settings help your files move smoothly from a home recording setup into a professional recording studio workflow.
Use WAV Files
Export your stems as WAV files whenever possible. WAV is an uncompressed audio format that preserves the quality of your recording. MP3 files are designed for smaller playback files and sharing, not for detailed mixing work.
A rough mix can be sent as an MP3 for listening convenience, but the tracks being used for the actual mix should be WAV files.
Export at 24 Bit or Your Native Session Bit Depth
For most artists sending files to a mixing engineer, 24-bit WAV is a strong professional standard. It provides detail and usable headroom for processing. Some sessions are recorded or processed at 32-bit float. When your engineer accepts 32-bit float files, and the DAW supports that workflow, staying in the native format can also be appropriate.
Do not convert files to 16-bit simply because the final song may eventually be streamed or distributed. Mixing and mastering happen before final consumer delivery.
Keep the Original Sample Rate
If your session was recorded at 44.1 kHz, export at 44.1 kHz. If your session was recorded at 48 kHz, export at 48 kHz. Do not change the sample rate just because you think a higher number automatically sounds better. Unnecessary conversion does not improve a recording and can create extra work.
Make Sure Every Stem Starts at the Same Point
All audio files should begin at the same point in the timeline, normally the beginning of the song or bar one. A guitar that does not play until the second verse should still export from the same starting point as the vocal and drums. The beginning of that guitar file will contain silence.
When every file starts together, your engineer can drag the files into a blank session, line them up at the beginning, and hear the correct arrangement immediately.
Turn Normalization Off
Normalization changes the level of an exported audio file. For professional mixing, normalization should remain off so the engineer receives the audio in the intended condition and can make level decisions inside the mix.
Remove Master Limiting for the Mix Files
Your rough mix may use a limiter, clipper, or loud master chain because that is how you have been listening to the song. Keep that version as a reference. For the actual files being mixed, turn off final loudness processing on the master output unless your engineer specifically requests otherwise.
The mix needs room to breathe. A loud file is not automatically a better file. A clipped or heavily limited file gives the engineer fewer options.
Include Audio Tails
Do not cut off the end of reverbs, delays, cymbals, instruments, or long vocal effects. Extend the end marker far enough so the song naturally decays. A clean ending matters in a professional mix.
Keep Mono Tracks, Mono and Stereo Tracks, Stereo
A centered mono lead vocal can normally be sent as mono. A stereo piano, stereo synth texture, stereo overhead pair, or stereo effect return should remain stereo. When a mono source uses an important stereo effect, consider sending a dry mono file and a separate stereo effected file.
Export Settings Checklist
File type: WAV
Bit depth: 24-bit or native session format accepted by the engineer
Sample rate: Same as your recording session
Normalization: Off
Master limiter: Off for files being mixed
Start point: Same point for every exported file
End point: Long enough to capture all tails
Mono or stereo: Match the source and any important spatial effects
Rough mix: Included separately
BPM and notes: Included in a text file or uploaded notes
Should You Export Stems Dry or With Effects?
This is where many artists get stuck. Should you remove your plugins and send completely dry files, or should the engineer hear the record the way you designed it?
The best answer is simple: keep effects that are essential to the sound’s identity, but avoid locking in unnecessary processing that limits the mix engineer’s options. When unsure, send both versions and label them clearly.
Lead Vocals
Send a clean lead vocal when possible. When the song relies on a specific vocal delay, a distorted vocal texture, a telephone effect, a tuned vocal style, or a wide reverb sound, include a second, effected version or a separate effect track.
A good vocal delivery folder may include:
Lead Vocal Dry
Lead Vocal Tuned
Lead Vocal FX Print
Lead Vocal Delay Throw
Lead Vocal Reverb
Background Vocals and Ad Libs
Background vocals can usually be sent clean, especially when the mixing engineer will create the space and width. When your hook includes a special, washed-out background texture or a heavily processed ad lib that defines the vibe, include that effected version as well.
Vocal Tuning
When tuning is part of the performance and style, send the tuned vocal. An intentionally modern, well-tuned vocal is not something the mix engineer should have to guess from scratch. You may also include an untuned alternate when available, but clearly identify which version you prefer for performance.
Guitars
When you recorded a clean direct guitar signal and used an amp simulator, send the direct input file and the amp sound you liked. The engineer may choose to use your tone, blend it, or reamp the clean version.
When you only recorded an actual amplifier, send the recorded amp track as-is. Label it clearly so the engineer knows what they are receiving.
Synths and Sound Design
If a plugin or effect is part of the sound design, keep it. Removing a filter sweep, distortion texture, chorus movement, or rhythmic gate could remove the part that made the production interesting. Basic corrective EQ or unnecessary compression can often be removed when the engineer needs more flexibility.
Reverbs and Delays
When reverb and delay are used only as a temporary measure to create space, it is fine to send clean tracks and let the engineer build the final environment. When the delay throw, vocal wash, reverse reverb, or special transition is an intentional production choice, export it as its own clearly labeled stereo file.
Drums and Beat Production
Send individual drum sounds when available. Individual Kick, snare, clap, percussion, hats, loops, and 808 files provide more mixing options than a single stereo beat. When you also love the balance of your existing beat, include a stereo rough beat print as a reference.
Dry and Wet Export Checklist
Send dry lead vocals and include essential vocal effects separately.
Send tuned vocals when tuning is part of the intended sound.
Send guitar direct input files along with amp sounds when available.
Keep creative synth processing that changes the actual identity of the sound.
Export significant delay and reverb effects as separate tracks.
Avoid sending a heavily limited master as the only version.
Include a rough mix so the engineer understands your preferred mood and balance.
How to Organize Your Stem Folder Before Uploading
Good file organization does not make a record sound better by itself, but it helps the engineer get to the sound faster. An organized folder reduces questions, reduces setup time, and makes revisions cleaner.
Use a main folder named with the artist and song title. Inside, keep the stems, rough mix, and song information easy to find.
Example Folder Setup:
(Artist Name) - (Song Title) (BPM) (Key)
Stems
Kick.wav
Snare.wav
Clap.wav
Hi Hat.wav
808.wav
Bass.wav
Piano.wav
Synth Lead.wav
Guitar.wav
Lead Vocal Dry.wav
Lead Vocal Tuned.wav
Lead Vocal FX.wav
Background Vocal Left.wav
Background Vocal Right.wav
Ad Libs.wav
Vocal Delay.wav
Vocal Reverb.wav
Rough Mix
Artist Name Song Title Rough Mix.wav
References and Notes
Session Notes.txt
Reference Songs
Reference 1.wav/mp3
Reference 2.wav/mp3
What to Include in Your Session Notes
Artist name
Song title
BPM
Key, when known
Your contact information
Your reference song(s)
Notes about vocal effects you want preserved
Notes about clean versions, explicit versions, alternate hooks, or instrumental versions
Any timing or arrangement detail your engineer should know before beginning
After everything is organized, zip the entire folder and upload it as one package. Before uploading, open a blank session in your DAW, import the exported files from the same starting point, and make sure the song plays correctly from beginning to end.
Exporting Stems in Specific DAWs
Just about every DAW on the market supports exporting stems. However, depending on which one you use, some extra steps may be necessary to ensure you render the ideal version of your song’s stems. Below, we will provide several guides on exporting stems, one for each major DAW we can think of.
How to Export Stems in Studio One
Studio One is built for a clean stem export workflow. For artists using Studio One, the important decision is whether you want to export raw tracks or printed channel audio that includes processing.
Steps
Open your completed song session.
Rename every track clearly before exporting.
Set the song start and end range so the export includes the full song and any audio tails. (This can be done either with Start and End Markers or through selecting the Loop section in the edit window before exporting. Just be sure you select “Between Start/End Marker” or “Between Loop” in the export window, depending on which you use.)
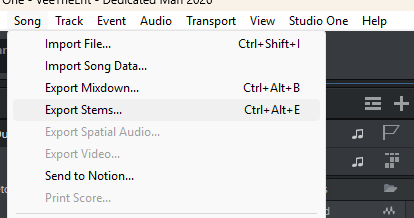
Go to Song > Export Stems.
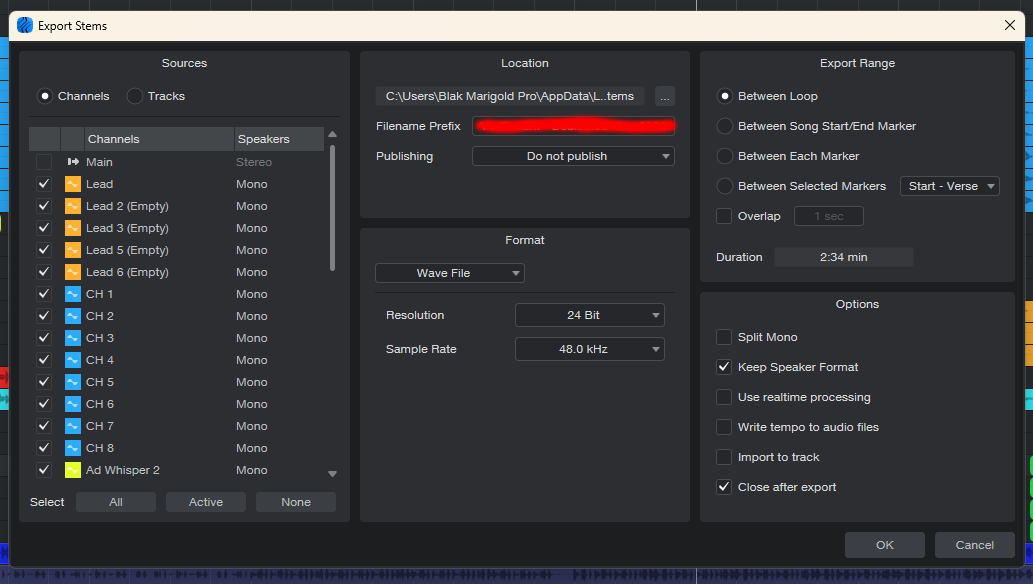
Use the Tracks tab when you want raw audio files without inserts or effects printed.
Use the Channels tab when you want to print a channel’s effect chain or export mixer channels such as effect buses.
Select the audio files and effect channels you need for the mixing session.
Choose WAV as the export format.
Use your session’s original sample rate and a professional bit depth, such as 24-bit, unless another native format has been requested.
Make sure normalization is off when available in your export setup.
Export the files into one clearly named folder.
Import the files into a blank session and listen once before uploading.
Studio One Tip for Vocals and Effects
When your vocal sound depends on a particular delay, reverb or creative processing chain, export the dry vocal and export the effected channel or effect bus separately. This lets your mixing engineer preserve the emotion of your original idea while still having the flexibility to refine the final mix.
Studio One Tip for Blak Marigold Clients
Studio One is also a strong way to prepare songs that were recorded at home and are being sent to a professional recording studio for mixing and mastering. Do not worry about making your rough session perfect before sending it. Focus on clean files, clear names and any effects that are truly part of the creative identity of your record.
How to Export Stems in Logic Pro
Logic Pro allows you to export all tracks as audio files, which makes it a useful workflow for sending a complete song to an outside mix engineer. It also gives you control over effects, audio tails, automation and normalization.
Steps
Open your finished Logic Pro project.
Rename every track with clear, useful names before export.
Confirm the project endpoint includes the full song and the natural end of any effects.
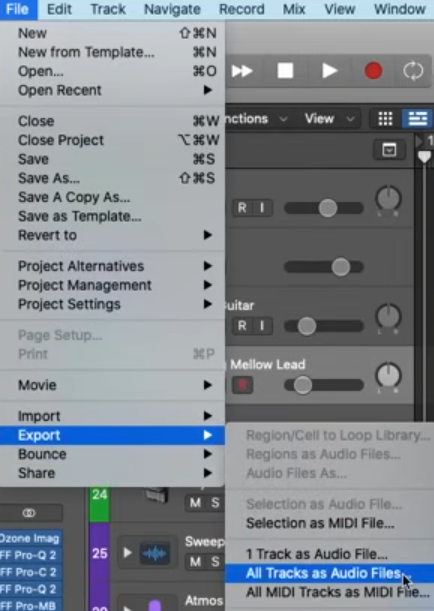
Go to File > Export > All Tracks as Audio Files.
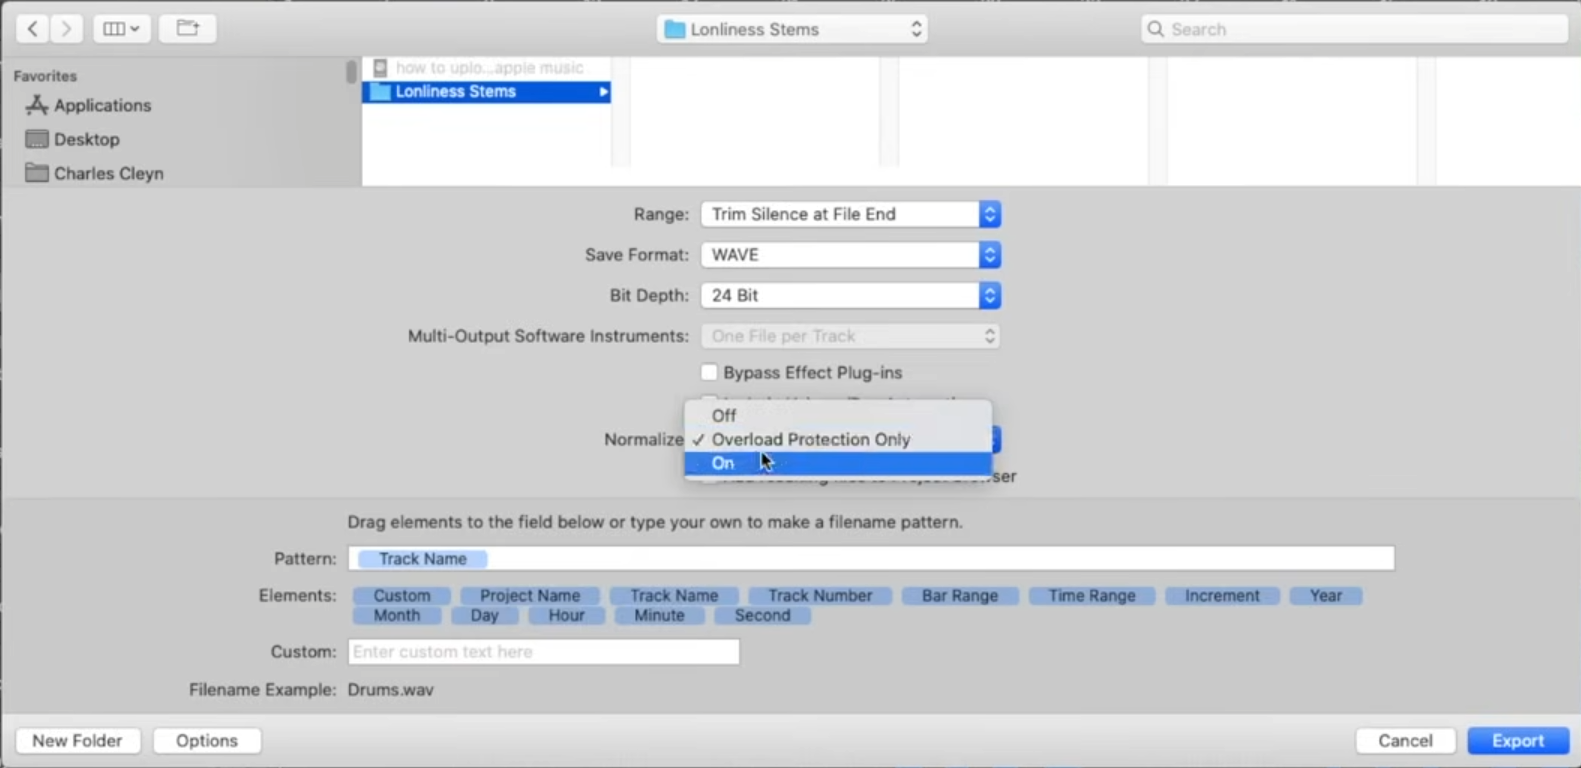
Choose WAV as the file format.
Choose 24 bit or your required native bit depth.
For multi-output instruments, choose the export option that provides the amount of separation your mix engineer needs. One File per Channel Strip can create additional files for individual multi output auxiliary channel strips.
Leave Normalize set to Off. If you want to make absolutely sure the tracks don’t clip, you can use the Overload Protection Only option.
Use Include Audio Tail when you need to preserve instrument releases, reverbs, or delays at the end of the song.
Decide whether effects should be printed. When you select Bypass Effect Plug-ins, Logic removes source track plugins from the export. Leave critical creative effects active, or send a second dry version.
Consider volume and pan automation carefully. For a mix engineer receiving tracks for processing, leaving volume and pan automation unprinted can offer more control. When automation is an intentional performance or creative movement, include a reference print or clearly explain it in your notes.
Save the files into your organized stems folder and check them in a blank session.
Logic Pro Tip for Vocal Production
If you recorded lead vocals, doubles and harmonies in Logic, export each part clearly instead of grouping every vocal into one stereo file. A professional mixing engineer can then control the depth, width and tone of every vocal layer without losing your creative direction.

Extra: How to Export Stems in GarageBand
While GarageBand Files can actually be opened and exported using Logic Pro, it doesn’t provide an obvious way to do so within its own program. There are, however, some workarounds if you have no other options. There are two main methods.
Method One: Render Each Track Individually
Solo Each track individually, one at a time.
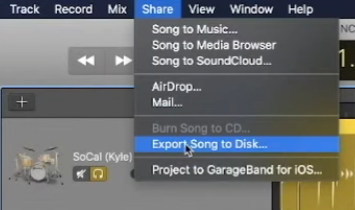
head to Share > Export Song To Disk like you would for exporting a song regularly. This causes the project to render only the solo’ed track.
Repeat steps 1 and 2 for each successive track, organizing them into a labeled folder. Be sure to label each track individually, as well.
Method Two: Freezing/Locking Tracks
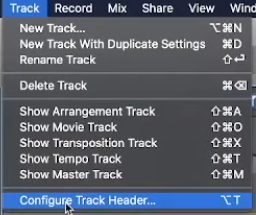
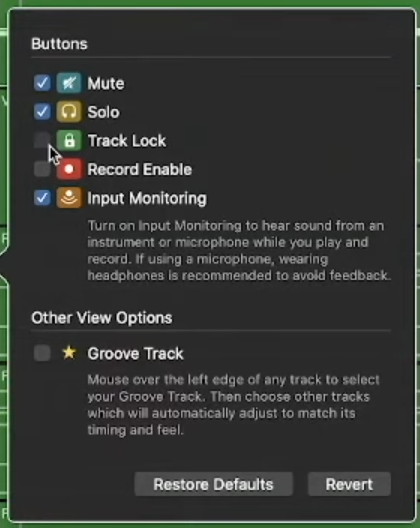
Go to Track>Configure Track Header…
Enable the “Track Lock” button
Lock Every Track in the session, then play the loop region you want to make stems from.
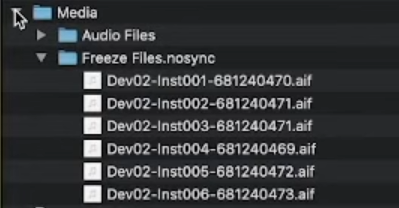
Go to the Project File in Finder, Right/Command Click the File and hit “Show Package Contents”
All of the frozen audio files will be in Media>Freeze Files.Nosync and ready to copy to another folder with a rough mix and notes like normal.
Note that this method leaves the frozen tracks unlabeled, so you should listen to the audio files and re-label them accordingly.


How to Export Stems in Pro Tools
Pro Tools sessions are common in professional recording studio environments, but you do not have to send an entire Pro Tools session for your song to be mixed. Clean audio files are often the simplest way to move a song between studios, systems and plugin setups.
Pro Tools workflows and available menu labels can vary depending on your version and whether you are exporting rendered tracks, committing processing or consolidating edited audio. The professional delivery goal remains consistent: every file should begin at the same point, use a lossless WAV format, preserve the session sample rate and arrive clearly labeled.
Steps
Save a new copy of your session before preparing mix files.
Clean up track names so your engineer can easily tell which file is for what.
Confirm final edits, fades, timing repairs and comped vocal choices are correct.
Define one shared timeline range that begins at the same point for every track and continues through the full end of the song.
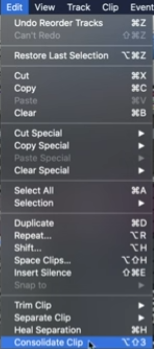
Render, bounce, commit, or consolidate the audio according to the tools available in your Pro Tools version and the type of processing you need printed.
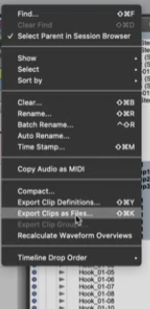
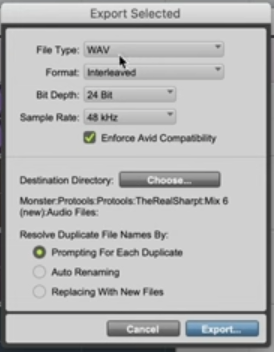
Export each required audio file as a WAV at the session’s original sample rate and appropriate bit depth. (Be sure to select all of the consolidated clips in the File window before doing this)
When exporting, your engineer may want the files formatted as “Interleaved” or “Multiple Mono”. It’s a matter of preference, but usually, we prefer “Interleaved.”
Remove final limiting and loudness processing from the master output for the mix delivery files.
Include any essential vocal effects or production effects separately when they are part of the record.
As always, include a rough mix so your engineer can hear the sound you approved before export.
Import the resulting files into a blank session to confirm that they remain aligned.
Pro Tools Tip for Professional Delivery
When working with a recording studio or remote mixing engineer, ask whether they prefer dry files, processed files or both. A lead vocal with edits and tuning complete may be exactly what the mix needs, while heavy bus compression or a loud master limiter may prevent the engineer from making the best final decisions.

How to Export Stems in FL Studio
FL Studio is widely used for beat production, vocal recording, and complete songs. The most important detail for a professional mix handoff is making sure the sounds you want separated are properly organized on Mixer tracks before export.
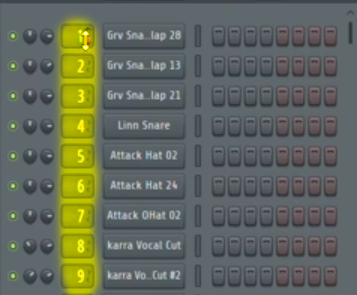
In FL Studio, the Split mixer tracks option exports each Mixer track as a separate WAV file. That makes the Mixer organization especially important. If your kick, snare and 808 all share one Mixer track, they will not arrive as separate mix files.
Steps
Open your completed FL Studio project.
Route each sound or musical part that needs separate mixing control to its own Mixer track. (This is set using the Numbers column
Rename important Mixer tracks clearly, such as Kick, Snare, 808, Piano, Lead Vocal, Background Vocal and Vocal Delay.
Make sure muted Mixer tracks are not hiding audio you intended to send.
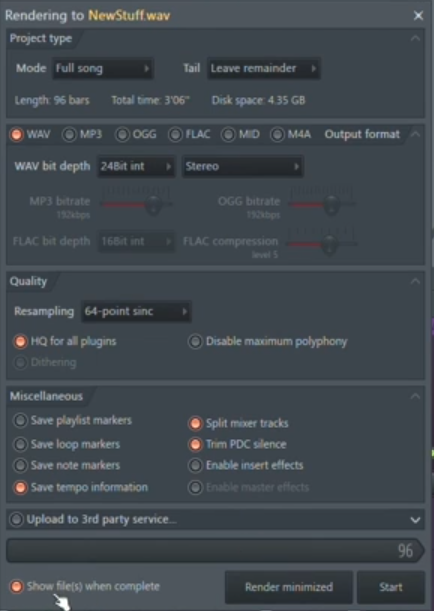
Go to File > Export > WAV file.
Use Song mode rather than exporting only a pattern.
Choose WAV as the output format.
Choose 24 bit or 32 bit float according to your intended professional workflow and your engineer’s preference.
Keep the session sample rate consistent.
Set the tail behavior to Leave remainder when your song includes reverbs or delays that need to decay naturally.
Turn on Split mixer tracks to create individual WAV files from the Mixer tracks.
Decide whether the insert effects need to remain printed. FL Studio can include Insert Mixer Channel effects in the exported files when that option is selected.
Remember that split Mixer track renders bypass master effects, so your individual tracks will not automatically include your master chain.
(Optional, but recommended for quick access to exported files) Hit “Show Files When Complete” before exporting.
Export, organize the files, and check the song in a blank session.
FL Studio Tip for Beats and Vocals
When sending a beat for professional mixing, separate the kick and 808 whenever possible. This gives the mixing engineer more control over low end impact, translation in the car and the way the song holds up during mastering. For vocals, keep lead vocals, doubles, backgrounds and ad libs separated whenever available.
[IMAGE INSERT NOTE: Add FL Studio Mixer screenshot with clearly renamed channels. File name: fl-studio-mixer-tracks-organized-for-mixing.jpg. Alt text: FL Studio Mixer with labeled drum, instrument and vocal tracks organized for stem export.]
[IMAGE INSERT NOTE: Add FL Studio export screenshot with Split mixer tracks selected. File name: fl-studio-split-mixer-tracks-wav-export.jpg. Alt text: FL Studio WAV export settings showing Split mixer tracks selected for professional mixing files.]

How to Export Stems in Ableton Live
Ableton Live makes it straightforward to export individual tracks from a production. Its export dialog can create separate audio files that share the same length, which is exactly what a mixing engineer needs for easy alignment in a new session.
Steps
Open your completed Live Set.
Rename each track clearly before export.
In Arrangement View, select the full range of the song from the common starting point through the complete ending and any desired effect tail.
Go to File > Export Audio/Video.
In Rendered Track, choose All Individual Tracks when you need every track exported separately, or choose selected tracks when you only need specific files.
Choose WAV under the PCM file options.
Set your intended bit depth and preserve the appropriate project sample rate.
Leave Normalize off for professional mixing delivery.
Keep Create Analysis File off unless the files are intended for immediate reuse inside Ableton Live.
Decide carefully how you want the return and main effects handled. When a return effect is essential to the sound, send it or print an additional effect version. Do not depend on a loud master chain for your mix files.
Export the files into a clean project folder.
Reimport the files and listen from start to finish before sending.
Ableton Live Tip for Return Tracks and Sound Design
Ableton productions often rely on return reverbs, delays, parallel chains, and creative devices. When those sounds are part of the arrangement or movement of the record, label, and include them. Sending only dry sound sources, without the effect moments that make the production work, can make the professional mix feel different from the version you loved.

How to Export Stems in BandLab
BandLab is a practical way for artists to record ideas, vocals and complete songs without a traditional recording studio setup. Those recordings can still be professionally mixed when the individual tracks are exported correctly.
Steps
Open your project in the BandLab Studio.
Review the track names and identify the files you need for mixing.
Click the project menu in the top left corner of the Studio.
Go to Project > Download > Tracks.
Choose WAV rather than M4A for the tracks that will be used in professional mixing.
Download each individual stem.
Label and organize the downloaded files in one folder.
Include a rough mix, your BPM when known and notes about any effects or vocal direction.
Zip the folder and send it to your mixing and mastering engineer.
BandLab also lets you export an individual track as audio or MIDI from within the project. The important part is choosing WAV for your professional audio files and sending enough separation for the mix engineer to control the final balance.
BandLab Tip for Artists Recording at Home
A song does not have to be recorded in a major studio session before it can be professionally mixed. A clean performance recorded in BandLab can still benefit from detailed vocal treatment, balancing, effects, stereo depth and mastering. The better organized your files are, the easier it is for a professional recording studio to help the song reach its potential.
[IMAGE INSERT NOTE: Add BandLab screenshot showing Project > Download > Tracks. File name: bandlab-download-tracks-wav-for-mixing.jpg. Alt text: BandLab Project Download Tracks menu used to export WAV files for professional mixing.]

How to Export Stems in Acoustica Mixcraft
While it is a lesser-used DAW compared to some others on this list, it is worth mentioning as our staff have also used it in the past, and we like to cover our bases. Mixcraft also renders the entire project by default, which is particularly useful when exporting stems.
Exporting Stems in Mixcraft
Open your project in Mixcraft
Review the track names and identify the files you need for mixing.
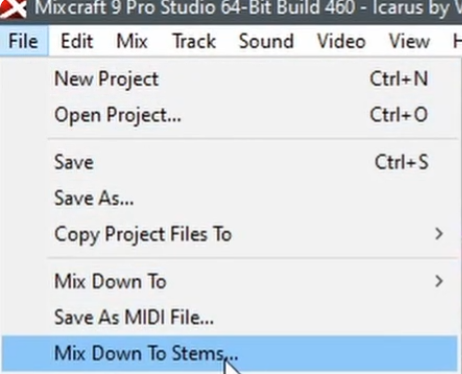
Go to File > Mix Down to Stems…
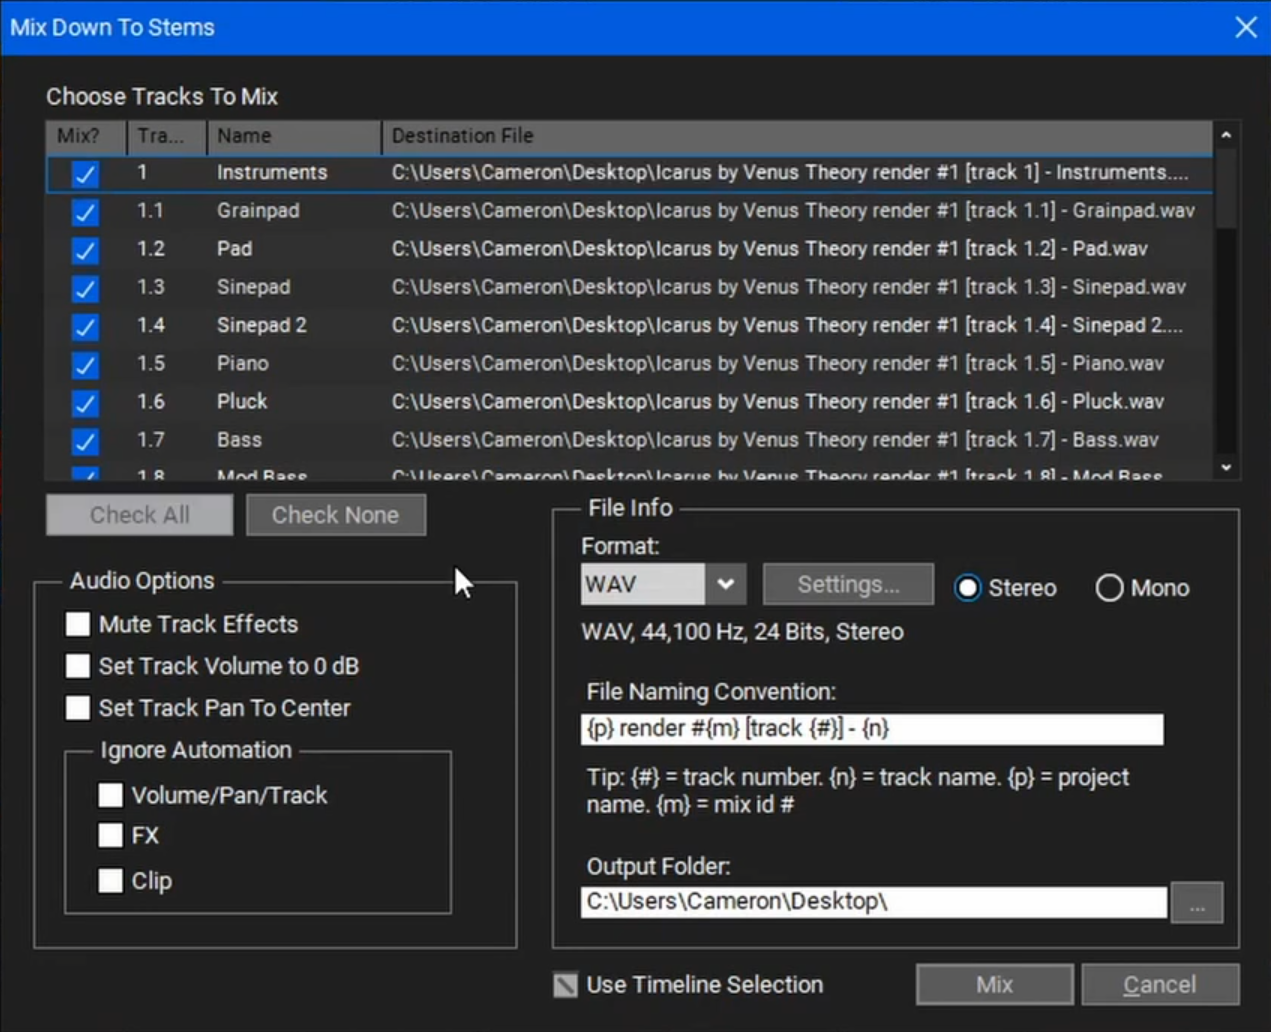
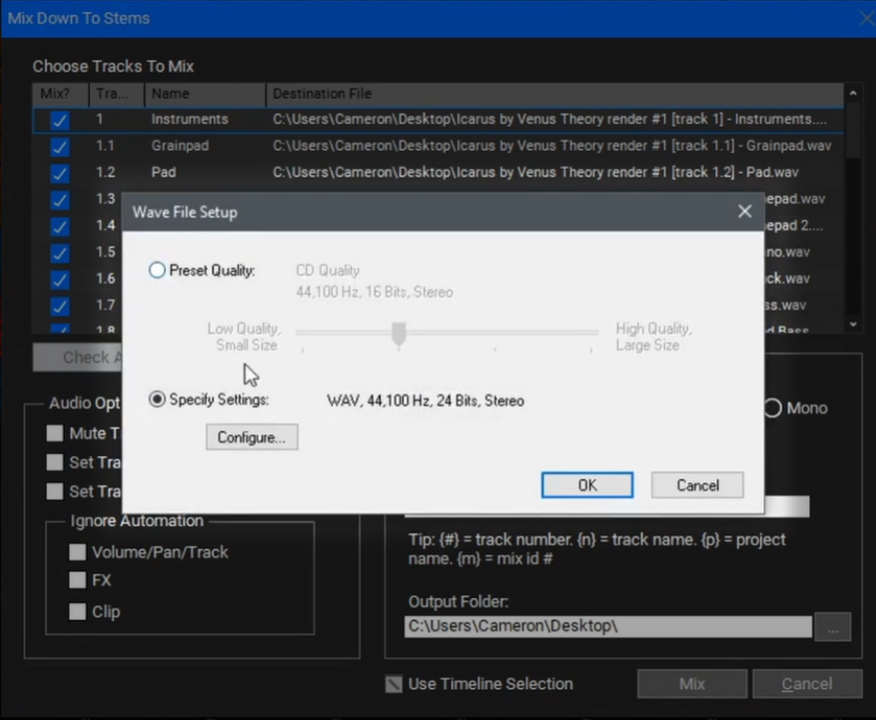
Set the format to WAV, match the Sample Rate to your audio device, and set the bit depth to 24 Bits
Select every track you want stems from in the “Mix?” column
Set the file naming convention the stems should use (Important commands include {p} for project name and {n} for track name, as well as {#} for track number
Select the output folder and hit “Mix”.
Include a rough mix, your BPM, and notes about any effects or vocal direction.
Zip the folder and send it to your mixing and mastering engineer.
Tips for Stems in Mixcraft
Since Mixcraft renders the entire project length by default, this can cause extended silence at the end of the render, even if nothing is playing and the reverb tail has already decayed. If there is an unmuted clip at the end of the timeline, the render will run until that part is played. You can prevent this by either double-checking that everything is muted after the intended ending of the track or by selecting the part of the timeline you want, then hitting “use timeline selection” when mixing down stems.

How to Export Stems in Cubase
Exporting stems in Cubase can require an extra bit of setup if you haven’t prepared the project file yet, but once you do, it’s pretty straightforward.
Steps
Open your project in Cubase
Go to File>Save As and save a duplicate file for mixing down stems. Label this new version accordingly.
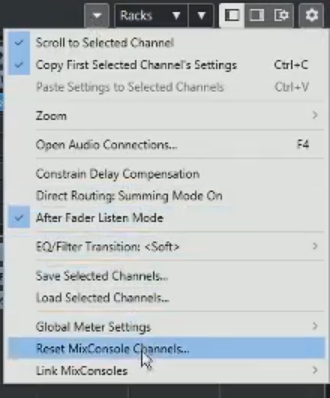
In the Mixing Console (F3), go to the dropdown panel in the top right and select Reset MixConsole Channels
Selectall tracks and bring them down together so that they aren’t clipping. A good peak level to aim for is -6 dB. Be sure to keep them all selected so they are all adjusted by the same amount
Hit Ctrl+A (Cmd+A for Mac Users) to select all events, then press P to set the region for the render.
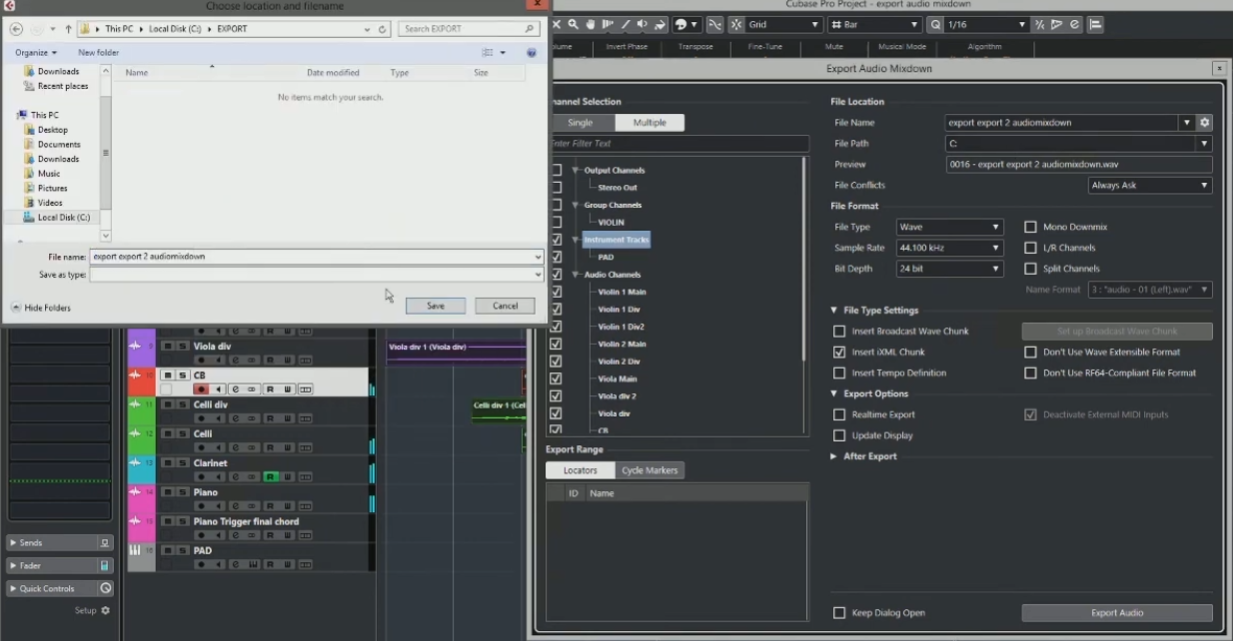
Go to File>Export>Audio Mixdown and make sure “Multiple” is selected in the Channel Selection window
Select all Audio Tracks and VST instruments you want to export
Make sure no tracks are muted
Set the Bit Depth to 24 and Sample rate to match your interface, unless requested otherwise by your engineer.
Select the output folder and hit “Export Audio”.
Include a rough mix, your BPM, and notes about any effects or vocal direction.
Zip the folder and send it to your mixing and mastering engineer.


How to Export Stems in Reaper
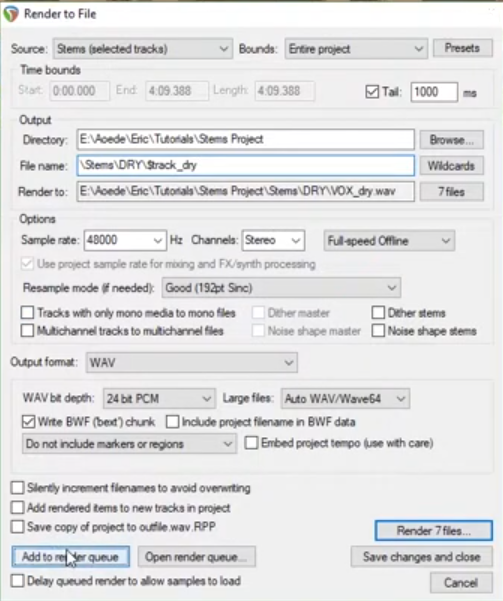
Reaper has a “Stems” option that you can pick in the render window. It also has a few nifty features that make it easier to organise them within the project folder itself, if you’re so inclined.
Exporting Stems in Reaper
Open your Project file in Reaper
Select the tracks you want to render in the mixer
Go to File>Render…
Set the Source to “Stems(Selected Tracks)” and the Bounds to “Entire Project”
Choose the Directory/folder you want the stems saved in
In the filename box, you can add additional backslashes to place the file within a new folder inside the one you already chose. You can also use “$Track” in the file name to quickly add the name of each track when rendering. You can also do this with “$Project”, “$Tempo” and anything else in the “Wildcards” menu.
Set your Bit Depth and sample rate.
If you need dry stems, make sure to mute any effects you’re using in the project file.
If you want to do both wet and dry stems, make sure to set them up using the render queue instead of immediately hitting “Render (number of) files”
In the Render Queue Window, double-check what files you’re rendering, then hit “render all”
Notes for other DAWs
You can send songs for mixing and mastering, even if your DAW is not included in the detailed sections above. The universal rules still apply: export full-length WAV files from a shared starting point, keep the original sample rate, label each audio file clearly, and include a rough mix. If you feel we should include another specific DAW, please reach out, and we’ll be sure to add it to this blog when possible.
Common Stem Export Mistakes That Delay Your Mix
A professional mixing and mastering session moves much faster when the files arrive ready to work. These common mistakes do not always ruin a project, but they can cost time and force the artist to export everything again.
Sending MP3 Files Instead of WAV Files
MP3 files are fine for sending a quick reference or sharing a preview. They are not the best source files for a detailed professional mix. Send WAV files for the audio being processed.
Sending Files That Do Not Start Together
When every track begins wherever the performance happens, the engineer has to manually place each sound back into the song. That is a preventable problem. Export every file from the same starting point, even if the beginning contains silence.
Forgetting the Rough Mix
Your rough mix tells the engineer what you were hearing: how loud the vocal felt, whether the hook widened, whether the delay was important and how aggressive the beat should be. Send it, even when it is not perfect.
Leaving a Loud Limiter on Everything
A limited reference mix is useful. Limited individual mix delivery files are usually not. Turn off final loudness processing for the tracks being mixed unless the effect is intentionally part of a specific sound.
Turning Off Every Creative Effect
Sending clean vocals and instruments can be helpful, but do not remove the actual personality of the record. When the hook depends on a delay, the synth depends on distortion, or the vocal depends on a signature texture, include it. Better yet, include both the clean version, and one with effects.
Cutting Off Reverb and Delay Tails
Let the ending breathe. Your final export range should be long enough for reverbs, delays, and instrument releases to fade naturally instead of being chopped off.
Sending Bad File Names
A folder filled with files called Audio 4, Audio 4 New, Track Copy and Vocals 1-12 is not helping anyone. Use names that tell the engineer exactly what the file is.
Clear examples include:
Kick
Snare
808
Piano
Lead Vocal Verse
Lead Vocal Hook
Background Vocal Left/Right
Ad-Libs
Vocal Reverb
Vocal Delay Throw
Forgetting Important Alternate Versions
When you need a clean version, performance version, instrumental, acapella or sync ready delivery, mention that before the mixing and mastering session begins. A strong recording studio workflow plans deliverables early rather than rebuilding them at the last minute.
Never Checking the Exports
Always open the exported audio files in a blank session before uploading. Press play. Confirm that the arrangement is correct, the vocal is there, the effects you need are there, and that nothing suddenly disappears halfway through the song.
What Happens After You Upload Your Stems?
Once your files are exported correctly, the technical setup is finished, and the creative mix can begin.
At Blak Marigold Studio, the first step is reviewing your delivery. Your engineer checks the file names, alignment, rough mix, audio quality, and any notes you included. When something is missing, it is always better to catch it before hours are spent building the mix around incomplete files.
Next comes the actual mixing process. This is where the song is shaped for clarity, emotion, and impact. Vocals are balanced against the production. The low end is controlled so the kick and bass work together. Harsh frequencies can be reduced, movement can be created with automation, and effects can be refined so the song feels intentional rather than crowded.
Mixing is not only about making every sound audible. It is about making the record feel right. A vocal should complement the instruments. A hook should lift. A beat should hit without swallowing the song. The mix should translate well on headphones, speakers, in cars, and in everyday listening systems.
After the mix is approved, mastering prepares the stereo record for final release and delivery. The mastering process focuses on final polish, tonal balance, controlled loudness, and translation across playback environments.
Whether you recorded at home, built a song in BandLab, produced the record in FL Studio, or tracked vocals in a professional recording studio, your music can be prepared for a professional final result when the files arrive, organized and with the creative direction clear.
Ready to Mix and Master Your Song?
Your stems are exported. Your rough mix is ready. Now it is time to turn the session into a finished record.
Blak Marigold Studio provides professional mixing and mastering services for artists in Austin, Manor, and other remote locations. Send your properly prepared stems, share your creative vision, and let an experienced studio team help your song translate with clarity, energy, and confidence.
FAQs About Exporting Stems for Mixing
-
Export your mix files as WAV whenever possible. WAV files preserve full audio quality and are appropriate for professional mixing and mastering. A reference mix may be included as an MP3 for convenience, but the files used in the mix should be WAV.
-
24-bit WAV is a reliable professional choice for most mix deliveries. When your session uses 32-bit float, and your mixing engineer accepts that format, 32-bit float may also be appropriate. Do not reduce files to 16-bit before the mixing and mastering process is complete.
-
Use the original sample rate of your session. A project recorded at 44.1 kHz should be exported at 44.1 kHz. A project recorded at 48 kHz should be exported at 48 kHz. Avoid unnecessary conversion.
-
Send dry files when you want the mixing engineer to have full control, but include effected versions or separate effect files when a sound is essential to the song. When in doubt, send both and label them clearly.
-
When tuning is part of your intended vocal sound or performance, send the tuned vocal. You can also include an untuned alternate when available, but tell the engineer which version represents your approved creative direction.
-
Turn off final master limiting and loudness processing for the files being sent to mix. You may still include a rough mix with a limiter as a reference so the engineer can hear the energy and direction you liked.
-
Yes. Every exported file should begin at the same point in the timeline so the tracks align automatically when imported into the engineer’s session.
-
Keep mono sources mono unless an important stereo effect needs to be preserved. Stereo instruments and stereo effect returns should remain stereo.
-
Yes. Your rough mix shows the engineer the balance, mood and effects you were hearing before delivery. It is one of the most useful reference files you can send.
-
Yes. BandLab allows artists to export individual tracks as WAV files. Clean recordings that are exported and labeled correctly can be professionally mixed and mastered.
-
Yes. Recording quality matters, but many songs created outside of a traditional studio can benefit from professional mixing and mastering when the performances are usable and the files are prepared correctly.
-
Include a rough mix, BPM, key when known, reference songs, your creative notes and any delivery versions you need, such as clean, explicit, instrumental, acapella or sync ready files.
-
A mixing engineer can still improve the vocal balance, effects and overall record, but there will be less control over individual elements inside the beat. When possible, request trackouts or separated beat stems from the producer before mixing.
-
Use clear labels such as Lead Vocal Verse, Lead Vocal Hook, Double Left, Double Right, Background High, Background Low, Ad Libs, Vocal Delay and Vocal Reverb. Clear labels reduce setup time and confusion.
-
Import the exported files into a blank session at the same starting point and play the song from beginning to end. When everything lines up, nothing is missing and no important effects are cut off, your files are ready to upload.
Final Stem Export Checklist
Before sending your record for professional mixing and mastering, confirm that you have completed each step:
WAV files exported for all required audio tracks
Original session sample rate preserved
Professional bit depth selected
Normalization turned off
Final master limiter removed from mix delivery files
Every file exported from the same starting point
Reverb and delay tails included
Important dry and effected versions labeled clearly
Track names organized and easy to understand
Rough mix included
BPM, key, references and notes included
Exported files checked in a blank session
Complete folder zipped and ready to upload
Good preparation gives your mixing engineer the cleanest possible starting point. More importantly, it helps your song move from a session full of ideas into a polished record that is ready to be heard.
Special thanks to Charles Cleyn, Tom Ward, StevenQBeatz, Major Mixing, Reaper Tutorials, and Mixcraft University, whose videos were helpful for obtaining quick screenshots of the project windows, and double-checking.