

By Michael Smith (Knolly Boy 2K), owner and lead engineer
This vocal EQ cheat sheet shows where the common vocal problems usually live, from rumble and mud up to harshness, sibilance and air, and the order to fix them in. Cut what is wrong first, boost only what is missing, and make every decision with the beat playing.
I mix vocals every week at Blak Marigold Studio in Manor, TX, just east of Austin, and my music credits total over 1.4 billion streams on Muso.ai. The same questions come up from artists and newer engineers all the time. Where is the mud? Why does my vocal sound harsh? Where do I put the high-pass? This guide answers them in one place, without getting too technical.
Michael Smith (Knolly Boy 2K), owner and lead engineer at Blak Marigold Studio in Manor, TX. Credits: over 1.4 billion streams on Muso.ai.
Read this first
Every frequency below is a general starting point, not a rule. The voice, the mic, the distance from the mic, the room and the beat all move these ranges. Use the chart to know where to look, then trust what you hear.
The EQ Vocals Cheat Sheet
Here is the chart. Each row is a problem area, where it usually sits, what it sounds like and a safe first move.
A starting map of where common vocal EQ problems usually live. These ranges are places to look, not settings to copy.
| Area | Typical range | What it sounds like | Starting move |
|---|---|---|---|
| Rumble and high-pass area | Below 80 to 120 Hz | Low thumps, stand and floor noise, plosive pops, AC hum | High-pass filter, 12 to 18 dB per octave. Raise it until the voice thins, then back off a little. |
| Body and warmth | 120 to 250 Hz | Weight and chest. Too little sounds thin, too much sounds heavy | Usually leave it. A small, wide boost of 1 to 2 dB only if the vocal feels thin in the mix. |
| Mud | 200 to 500 Hz | Cloudy, thick, blurry words | Wide cut of 2 to 4 dB, Q around 1 to 1.5. Sweep to find the worst spot. |
| Boxiness | 300 to 700 Hz | Cardboard box or small room sound | Medium cut of 2 to 4 dB, Q around 2 to 4. |
| Nasal and honk | 800 Hz to 1.5 kHz | Pinched, through the nose, telephone-like | Narrow cut of 2 to 3 dB. Go gently, this area also carries intelligibility. |
| Presence and clarity | 2 to 5 kHz | Words that cut through and sit forward | Wide boost of 1 to 3 dB only after the cuts, and only if the vocal still hides. |
| Harshness | 2.5 to 6 kHz | Ear fatigue, stinging or piercing on loud notes and bright vowels | Narrow cut of 2 to 5 dB, Q around 4 to 8, on the exact resonance. Dynamic control if it only happens on loud notes. |
| Sibilance | 5 to 10 kHz | Sharp S, T, SH and CH sounds that jump out | A de-esser or clip gain on the worst esses before any EQ cut. Avoid wide cuts that dull the whole vocal. |
| Air | 10 to 16 kHz and up | Openness, breath, expensive top end | High shelf of 1 to 3 dB, added after de-essing. Skip it if the vocal is already bright. |
Q is the width of an EQ band. A low Q (around 1) is wide and smooth. A high Q (4 and up) is narrow and surgical.
Print this cheat sheet
Download a one-page vocal EQ cheat sheet with the same starting points as the chart above. Use it at the desk, then adjust it to the voice in front of you.
Download the printable cheat sheet (PDF)
Want a visual way to find potential harshness? Download Blak Marigold Pro EQ free.
Vocal EQ Settings for Male and Female Vocals
Voices sit in different places, so the same EQ move can land differently. A lower voice has its weight lower and often its sibilance lower too. A higher voice tends to push its body, bite and esses further up. The chart above still applies. You just slide your search a little lower or higher.
- Vocal EQ settings for male vocals. High-pass often lands around 70 to 100 Hz. Mud tends to show up around 200 to 400 Hz. Presence is usually around 3 to 5 kHz, and sibilance often sits around 4 to 8 kHz.
- Female and higher vocals. The high-pass can often go a bit higher, around 100 to 150 Hz. Boxiness may sit closer to 400 to 800 Hz. Harshness and sibilance often move up, with esses commonly around 6 to 10 kHz.
Treat those as places to start sweeping. A baritone singer, a bright rapper and a breathy R&B vocal can all break these patterns, and the mic choice can matter as much as the voice.
How to EQ Vocals Step by Step
This is the order I work in. It keeps you from piling on boosts to cover up problems you never cut.
1. Gain stage before you touch the EQ
Set a healthy level going into your chain, with plenty of headroom and no clipping. Many engineers aim for vocal peaks somewhere around -12 to -6 dBFS while recording and mixing. Level changes fool your ears, and a clipped take cannot be fixed with EQ. Clean dynamics and proper gain staging are the foundation of a clean mix.
2. Clean up the low end
Add a high-pass filter and raise it until the vocal starts to sound thin, then back it off slightly. This removes rumble, handling noise and some plosive energy that would otherwise hit your compressor.
3. Cut before you boost
Subtractive EQ first. Remove mud, boxiness and honk before deciding whether anything needs to be added. Very often a vocal that seemed dull just needed 3 dB less around 300 Hz.
4. Sweep and listen
Turn your monitors down a little. Make a narrow band, boost it about 6 to 10 dB, and slowly sweep through the problem area. When the ugly tone jumps out, stop, then flip the boost into a cut and dial the amount back until the problem is just under control. Not every loud spot during a sweep is a problem. A boost makes everything sound bad.
5. Use narrow cuts for resonances and wide moves for tone
Ringing resonances and harsh spots want a narrow Q. Broad tone changes, like warming or brightening, want a wide Q and small amounts. Big, wide cuts can hollow out a vocal fast.
6. Add presence and air last, and gently
After the cleanup, decide if the vocal needs more forward energy around 2 to 5 kHz or more air above 10 kHz. One to three dB is usually plenty. Control sibilance before you add air, or the air boost will make the esses worse.
7. Bypass and match the level
Flip the EQ on and off while the vocal plays. If the EQ version is louder, it will fool you into thinking it is better, so match the output level before you judge.
8. EQ in the context of the mix
Solo is for finding problems. Decisions get made with the beat playing. A vocal that sounds a little thin alone often sits perfectly against an 808 and a busy midrange. Then check on other speakers, earbuds and the car. Our guide to why your mix sounds bad in the car covers that last step.
Harshness and Sibilance Tips
Harshness and sibilance are the two complaints I hear most about home vocals. They are related, but they are not the same thing.
Harshness is usually a resonance in the upper mids, often somewhere between 2.5 and 6 kHz. It stings on loud notes and certain vowels, and it gets tiring on headphones. Common causes are a bright mic, singing too close or off axis, a reflective room, heavy compression bringing up the edgy parts, and too much top-end boost.
- Sweep for the exact spot and use a narrow cut. Two to four dB at a focused Q often fixes it without dulling the vocal.
- If the harshness only shows up on loud lines, a static cut may take out tone on the quiet parts too. Automating the cut so it only kicks in on those lines is gentler.
- Check after your compressor and saturation, since both can bring harshness back.
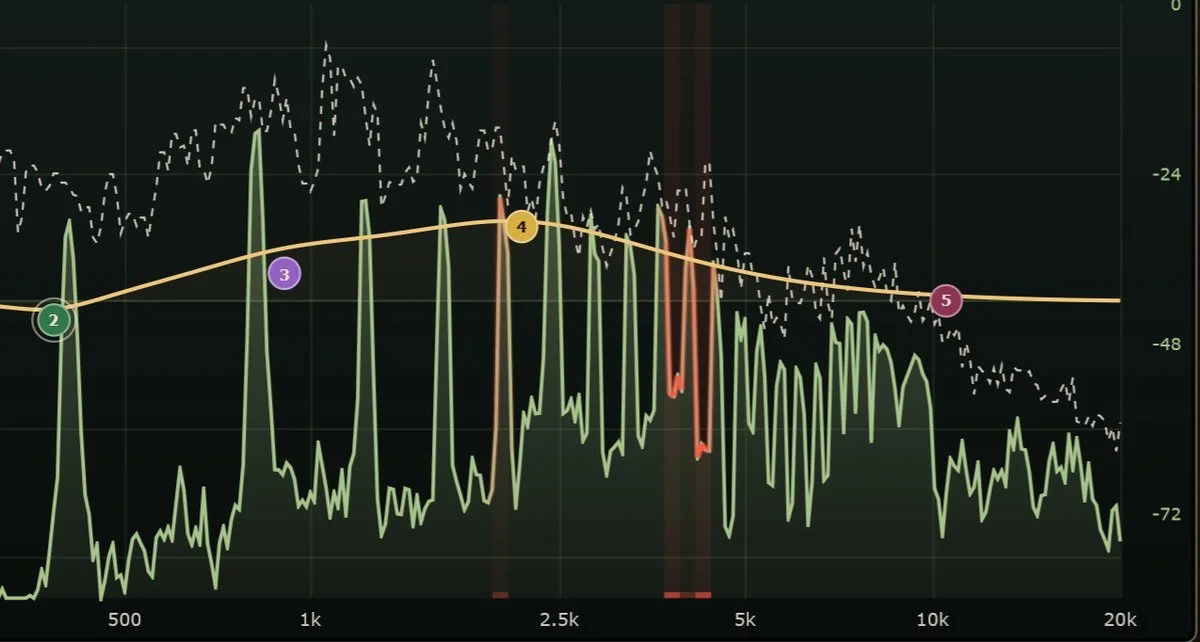
Drag a band onto a red highlight and listen. Red marks potential harshness, not an automatic cut.
Sibilance is the S, T, SH and CH sounds, usually somewhere between 5 and 10 kHz. A little is natural. Too much sounds like hissing on every word.
- Control esses with a de-esser or by turning down the worst ones with clip gain, before you add air.
- Do not over de-ess. If the singer starts to sound like they have a lisp, back it off.
- Watch reverb and delay sends. Bright esses hitting a reverb get louder. De-ess the send or put a gentle high cut on the effect.
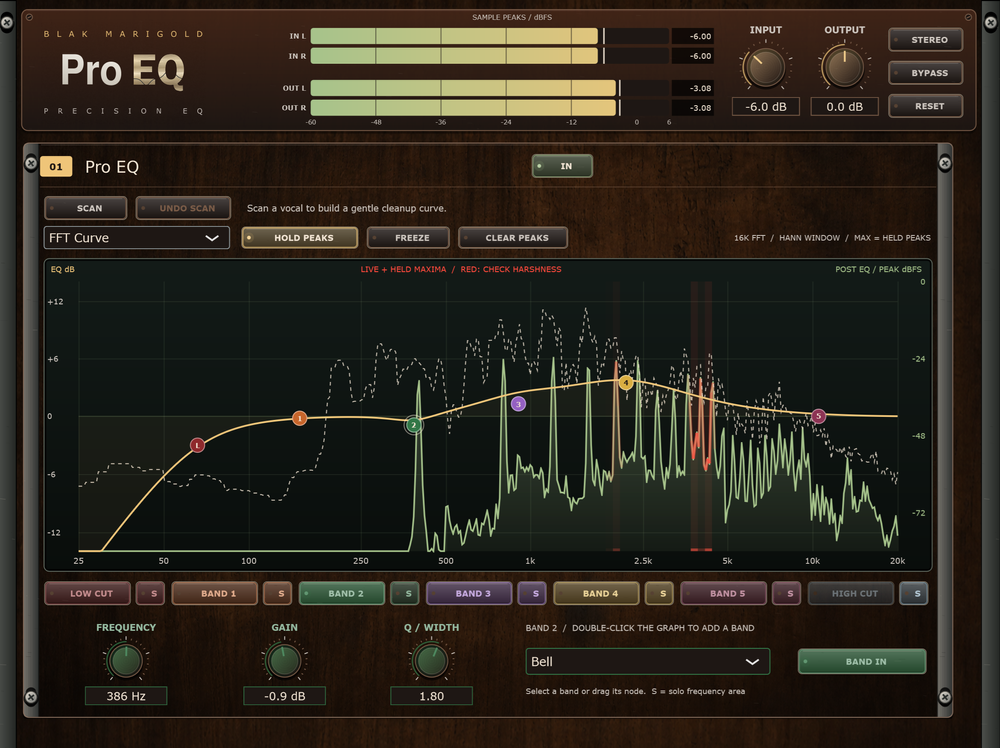
A tool I built for this exact problem
Finding harshness by ear is a skill that takes time, and some of these frequencies are hard to hear on the gear a lot of artists start with. That is why I built Blak Marigold Pro EQ, the vocal EQ plug-in in our Precision Vocal Rack. It highlights potential harsh frequencies in red so you know where to listen closer, lets you audition that area with Band Solo, and shows recurring resonances over time in a Waterfall view. Its smart Scan listens to a short section of the vocal and gives you an editable, balanced starting curve. You still make the final call with your ears.
Pro EQ is a VST3 plug-in for Windows x64, tested in Studio One 7. It is available now as a free download. Download Pro EQ free, or browse everything on our plugins page.
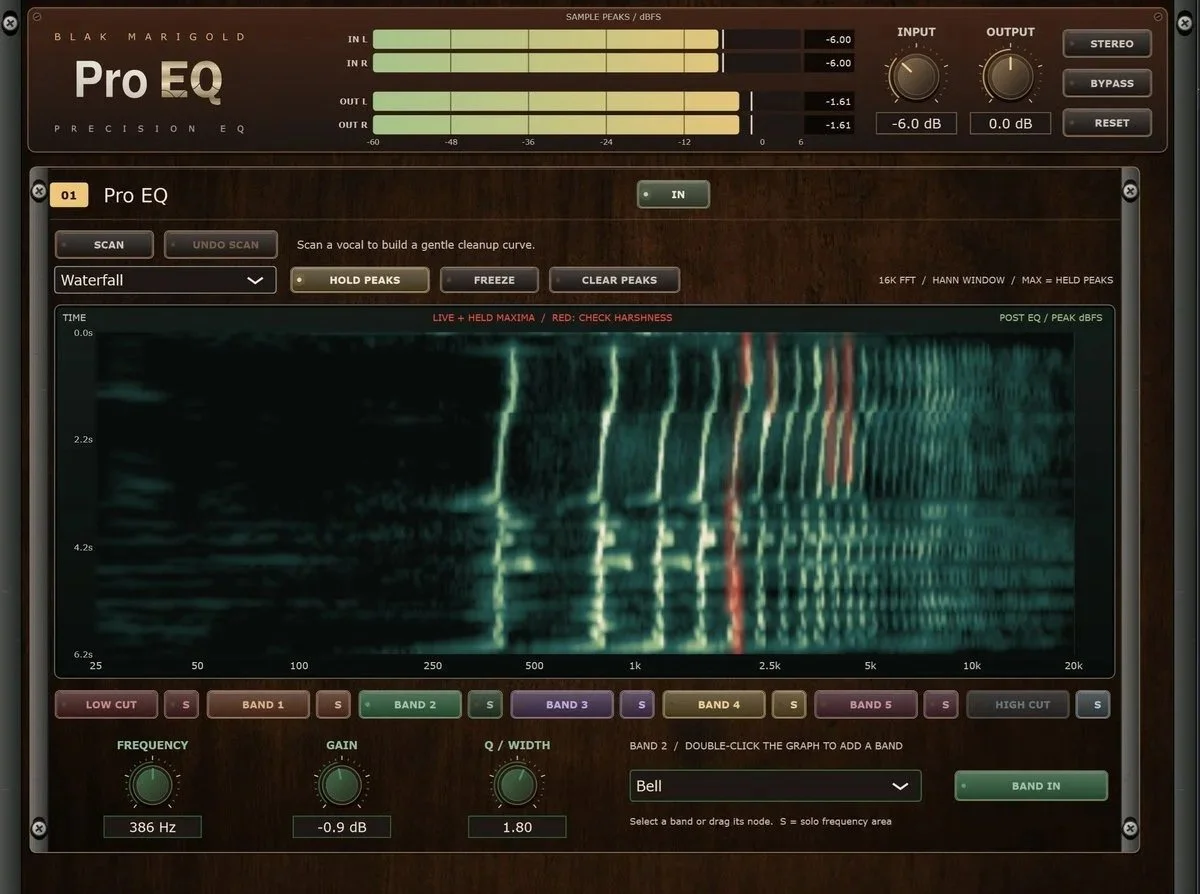
Waterfall view in Blak Marigold Pro EQ. Recurring peaks show up as streaks over time. Red is a place to listen closer, not an automatic cut.
Common Vocal EQ Mistakes
- Making every decision in solo. The vocal has to work against the beat, not by itself.
- Boosting to fix what should be cut. Adding highs to a muddy vocal just makes a bright, muddy vocal.
- Cutting every frequency a sweep makes ugly. Too many cuts leave a thin, hollow voice. Fix the two or three real problems.
- Setting the high-pass too high. The vocal loses its weight and sounds small next to the beat.
- Adding air before de-essing. The esses get louder and harsher.
- Not level matching. Louder sounds better for a few seconds, which hides bad EQ moves.
- Copying preset numbers. A setting that worked on someone else's voice and mic is only a guess on yours.
- Trying to EQ away a recording problem. Room echo, distortion and a bad mic position are much easier to fix at the source.
If the vocal still is not sitting right after all of this, that is normal. Vocal mixing is EQ, compression, de-essing, automation and effects working together, and that is the job we do every day.
Get your vocals mixedSee our plugins
Get It Right at the Source
The best EQ move is often a better recording. A good mic in a treated room, at the right distance, with a strong performance needs far less fixing. If you are near Austin, you can record at Blak Marigold Studio in Manor, TX. Recording starts at $50 per hour, and every session includes a professional engineer. See our studio pricing guide for the full breakdown.
Keep Learning
- Vocal mixing in Austin, from bedroom takes to radio ready
- How to export stems for mixing and mastering without revisions
- Why your mix sounds bad in the car and how to fix it
Final Thoughts
Use this EQ vocals cheat sheet to know where to look, not what to do. Gain stage first, clean up the low end, cut before you boost, sweep with care, and judge everything in the mix with the EQ bypassed and level matched. If you want a visual way to find harshness, keep an eye on Pro EQ. If you would rather hand the vocal to an engineer, we are here.
Vocal EQ Questions
What frequencies should I cut on vocals?
Start with a high-pass filter somewhere around 80 to 120 Hz to clear rumble. Then check the mud area around 200 to 500 Hz, boxiness around 300 to 700 Hz, and nasal tones around 800 Hz to 1.5 kHz. Only cut what you actually hear as a problem. These ranges are starting points, and every voice, mic and room moves them.
What are good vocal EQ settings for male vocals?
For many male vocals, a high-pass filter around 70 to 100 Hz, a small mud cut somewhere between 200 and 400 Hz, a gentle presence lift around 3 to 5 kHz if needed, and sibilance control around 4 to 8 kHz is a reasonable starting point. A deep voice may need the high-pass lower. Treat these as places to listen, not settings to copy.
How do I EQ vocals for clarity?
Clarity usually comes from removing mud and boxiness first, not from boosting the top. Cut the cloudy areas between about 200 and 700 Hz, tame any harsh resonance, then add a small, wide presence boost around 2 to 5 kHz only if the words still hide. Check it with the full beat playing, because clarity is about how the vocal sits against the music.
Should I EQ vocals before or after compression?
A common approach is to do cleanup EQ before the compressor, such as the high-pass filter and cuts for mud or resonances, so the compressor is not reacting to rumble and ringing. Tone-shaping boosts like presence and air often go after compression. There is no single rule, so try both orders and keep the one that sounds better in the mix.
Where is sibilance in a vocal?
Sibilance usually sits somewhere between about 5 and 10 kHz. Lower and darker voices often have it nearer 4 to 7 kHz, and brighter voices nearer 6 to 10 kHz. Find it by soloing a loud S sound and sweeping that area, then control it with a de-esser or clip gain before you add any air.
Where should I set the high-pass filter on vocals?
Many vocals can be high-passed somewhere between about 80 and 120 Hz, with deep male voices often closer to 70 to 90 Hz and many female voices able to go a bit higher. Raise the filter until the voice starts to lose weight, then back it off slightly. Listen in the mix, since a filter set too high makes the vocal thin.
Can I use the same vocal EQ settings on every song?
You can reuse a chain as a starting template, but the settings almost always need adjusting. The voice, the mic, the room, the performance and the beat all change where the problems are. Use a cheat sheet to know where to look, then let your ears decide on every song.
